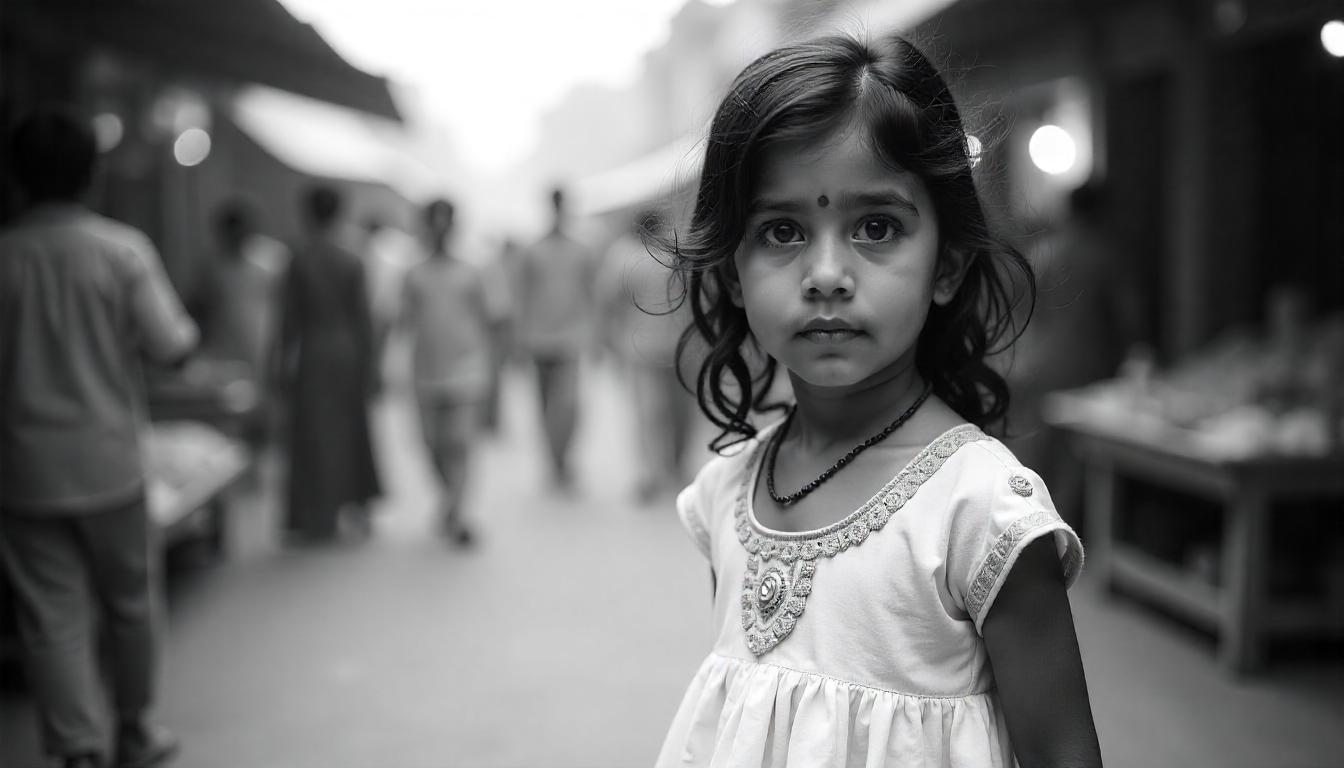


Artificial intelligence can conjure almost any image imaginable, but one of the most sought-after (and trickiest) feats is generating truly photorealistic portraits of people. We’re not talking about cartoon characters or stylized illustrations, but images that look convincingly like they were captured with a real camera, featuring realistic skin, natural lighting, and believable expressions.
Achieving this level of realism requires moving beyond basic prompts and employing specific techniques. This guide explores tips and tricks for crafting lifelike human (or humanoid) portraits using AI image generator in April 2025.
1. Choose Your Tools Wisely
Not all AI models excel equally at photorealism.
- Stable Diffusion: Highly capable, especially when using community-developed checkpoint models specifically fine-tuned for realism (popular examples in the past included Realistic Vision, DreamShaper, Absolute Reality – always check sites like Civitai for current SFW recommendations). Running locally offers the most control.
- Midjourney: Known for its artistic output, but recent versions (like V6+) are very capable of photorealism when prompted correctly. May require specific parameters (like
--style raw) to reduce inherent stylization. - DALL-E 3 (via Copilot/ChatGPT): Generally aims for realism and follows prompts well, making it a good option, especially for integrating specific details.
- Adobe Firefly: Designed for commercially safe, realistic output, though it might sometimes produce results that feel slightly less “edgy” or detailed than specialized Stable Diffusion models due to its training data and safety focus.
- Specialized Tools: Platforms like Aragon.ai or HeadshotPro focus specifically on generating professional AI headshots, often using your own photos as input for high realism (but less creative freedom).
2. Prompt Like a Photographer
To get a photograph, you need to “speak” photography to the AI. Generic prompts yield generic results.
- Core Realism Keywords: Always include terms like:
photorealistic,realistic photo,hyperrealistic,ultra realistic,photography. - Camera & Lens Specifics: Add technical details. Even if the AI doesn’t perfectly simulate the exact gear, these terms strongly push towards a photographic look:
DSLR photo,shot on Canon EOS R5,85mm lens,f/1.8 aperture,medium format film photo,shallow depth of field,bokeh background. - Master the Lighting: This is critical for realism. Be specific!
- Natural Light:
soft natural window light,golden hour lighting,overcast day lighting,dappled sunlight. - Studio Light:
studio portrait lighting,three-point lighting,Rembrandt lighting,split lighting,softbox lighting,rim light,high key lighting,low key lighting. - Atmospheric:
cinematic lighting,moody lighting,dramatic shadows,volumetric lighting.
- Natural Light:
- Composition Matters:
close-up portrait,medium shot,headshot,environmental portrait(showing subject in their surroundings),candid shot,posed portrait,eye-level view,low angle shot. - Subject Details (The Nitty-Gritty): Go deep!
- Face:
detailed iris,catchlights in eyes,realistic skin texture,skin pores,subtle wrinkles,freckles,slight smile,thoughtful expression,looking directly at camera. Specify age (woman in her 40s), ethnicity, hair (wavy brown hair with realistic texture). - Clothing/Context: Describe materials (
worn leather jacket,silk dress,detailed fabric texture) and background (blurred urban background,simple studio backdrop,in a library setting).
- Face:
3. Dodging the Uncanny Valley & Fixing Flaws
AI portraits can sometimes look almost real but feel subtly wrong or creepy. Here’s how to combat common issues:
- The “Too Perfect” Problem: AI can sometimes generate overly symmetrical or flawless faces.
- Fixes: Prompt for
subtle asymmetry,natural imperfections. Avoid prompts that demand absolute perfection. Realistic lighting helps break symmetry.
- Fixes: Prompt for
- Dead Eyes: Eyes lack life or realistic reflections.
- Fixes: Specifically prompt for
detailed iris,realistic eye reflection,catchlights in eyes, and a clear expression (thoughtful gaze,smiling eyes).
- Fixes: Specifically prompt for
- “Plastic” Skin: Skin looks too smooth, airbrushed, or doll-like.
- Fixes: Add
realistic skin texture, detailed skin, pores, subsurface scattering(if supported) to your positive prompt. Use negative prompts like-plastic skin, smooth skin, airbrushed, flawless skin, illustration, cartoon, 3d render. Specific LoRAs for skin detail exist for Stable Diffusion.
- Fixes: Add
- Anatomy Nightmares (Hands!): The classic AI struggle.
- Fixes: Use strong negative prompts (
-bad hands, deformed hands, extra fingers, fused fingers, bad anatomy). Simplify the requested pose. Use inpainting/AI editing (Photoshop Generative Fill, specific AI hand fixers) to regenerate just the hands. ControlNet OpenPose is powerful for controlling poses accurately in Stable Diffusion.
- Fixes: Use strong negative prompts (
4. Advanced Techniques for Peak Realism
- Essential Negative Prompts: Beyond fixing specific flaws, a good general negative prompt for photorealism is vital. Always include terms like:
-cartoon, illustration, drawing, painting, sketch, anime, 3d render, CGI, unreal engine, videogame, disfigured, deformed, bad anatomy, blurry, low quality, worst quality, text, watermark, signature. - Reference Images (Used Ethically!):
- Style Reference: Feeding an example photograph (via img2img,
--sref, Firefly reference) to guide the lighting, mood, and overall photographic style can be very effective. - Likeness Reference: Using a photo of a specific person to generate that person (via img2img,
--cref, LoRAs) is technically possible but ethically fraught. Do not do this without explicit consent. Focus on generating novel, realistic people inspired by general references, not replicating specific individuals without permission.
- Style Reference: Feeding an example photograph (via img2img,
- ControlNet (Stable Diffusion): Beyond fixing poses, ControlNet can use depth maps for realistic lighting interaction on the face/body, or Canny/Lineart to precisely match a reference composition.
- AI Editing & Post-Processing: Don’t expect the raw AI output to be perfect. Use AI upscalers (Topaz Photo AI, Magnific AI) to enhance resolution and detail. Use photo editors (Photoshop, Lightroom, etc.) for final color grading, contrast adjustments, and minor touch-ups using either traditional tools or integrated AI features like Generative Fill or AI denoise/sharpening.
5. An Ethical Note
The power to create realistic human images comes with responsibility. Avoid generating deepfakes, non-consensual imagery, or visuals that promote harmful stereotypes. Be mindful of privacy and likeness rights. Consider transparency if sharing AI portraits that could be mistaken for photos of real, living individuals.
Conclusion
Creating truly convincing photorealistic portraits with AI is an art form in itself. It demands more than just a simple description; it requires thinking like a photographer. By carefully choosing your tools, crafting detailed prompts rich with photographic language (lighting, lens effects, textures, subtle imperfections), employing negative prompts strategically, and utilizing advanced techniques like ControlNet or post-processing, you can coax stunningly lifelike results from the AI. It takes practice and iteration, but the potential to generate captivating, realistic human figures is well within reach.